After clicking Run from a Report Criteria menu, or Print from a sighting listing, you will be presented the Report and Listing Print Options dialog.
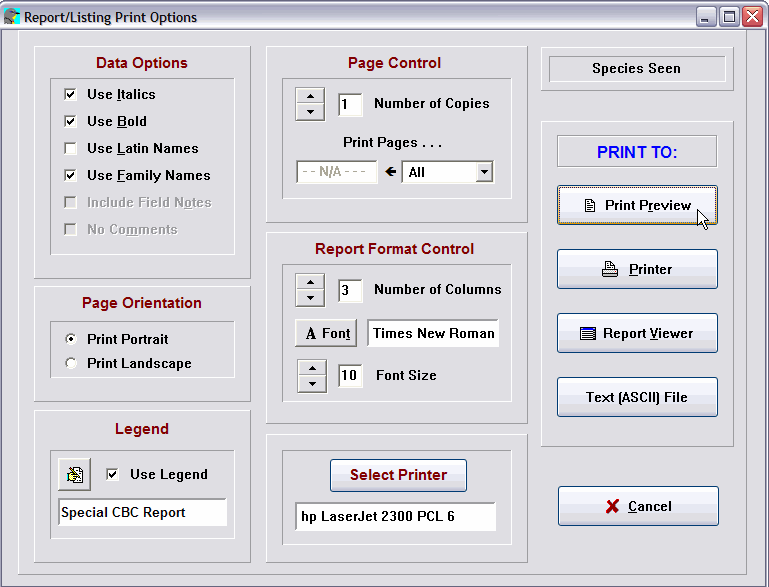
90% of the time, you will be dealing only with one of the four Print Destination buttons. All the other stuff is for special requirements.
The four Print Destination buttons define possible destinations for your report output. You simply click the destination you want. The possible destinations are:
This option provides a graphical (WYSIWYG) image of the printed pages of your report. This option is useful for reading your data if you have a good monitor. It is designed to show you exactly what the printed page will look like. Use the Screen Viewer to read your data if this option doesn't give you a good image.
This button sends your report output to your printer.
This is not really a Print operation. In fact, it has nothing to do with your printer. This button, which you will probably use the most, invokes a special screen viewer that is custom designed for the particular report you are running. Unless your monitor provides a superb quality image, this is the best way to look at your data, short of actually printing it on paper.
This button sends your output to a text file on your hard drive. The precise format depends on the kind of report you are running. The details of the various formats are covered in those report topics.
Legend allows you to add a legend (description) of up to 48 characters (24 characters for a Checklist report) at the bottom of reports and listings. Click the Legend button to get an edit in which you type the legend you wish. If the Legend box is checked, the legend will be printed.
The Columns selection is appropriate only for Species Seen, Species Not Seen and Checklist reports. The spinner allows you to select up to eight columns, the practical limit. However, you can type a larger number into the edit. For more columns, select a proportionately smaller font.
Use Italics, Use Bold, Use Latin Names, and Use Family Names check boxes are enabled only where they are appropriate to the selected report or listing type. You will probably check Use Latin Names sparingly as it doubles the number of lines in a report and tends to obscure the more important report data.
Include Field Notes is enabled only when listing sighting records, and causes attached Field Notes to be printed in-line with the records. Likewise, Include Comments is an opportunity to not print comments in a listing, doubling the number of records printed per page.
Print Portrait cause printing in the normal vertical format on paper. Print Landscape causes printing with the wide dimension of the paper horizontal. Reports and listings do not adjust their content or format to take advantage of landscape printing, but that mode does allow you to select a larger font for reports than you could normally use across the narrow width of the paper. A good use would be, if you find it difficult to use reading glasses in the field, to print your state or custom checklist in Landscape mode, 3 columns, 14 point Times New Roman font. That size type is very legible to many reading-distance disadvantaged people, such as me.
The Copies edit allows you to print multiple copies on those printers that support multiple copies.
The Print Pages edit allows you to print all or only the odd or even pages of a report, or a selection like 3,1-6, 9,12. With a laser or ink-jet printer, Odd/Even allows you to print reports on both sides of the page. Print the odd pages first, then reload the pages to print the even pages. You will have to experiment with your printer to determine how the pages are reloaded so that the blank sides are printed on the second pass.
The Font button opens a dialog where you can select a font. With laser and ink jet printers, the True Type/Open fonts are good choices. Frequently, a non-serif font like Arial provides a cleaner print image than a serif font like Times New Roman on the less expensive printers. Choose a font with care if you have a dot matrix printer -- hopefully, your printer driver will allow use of an internal font.
You can use the font dialog to select the font size (8 points or larger), or you can type the desired size into the Size edit in the Print Options dialog. The latter method allows you to choose sizes lower than 8 points.
Beware of using "display" fonts for reports. Those typically wide, splashy fonts have unusual metrics which make them format badly. Their use should be reserved for things like headlines in newsletters.
Note: Not all features are supported by all printers and/or printer drivers. If you have trouble with a particular feature your printer is supposed to support, we recommend that you contact the printer vendor for an updated driver.
Switching printers may cause problems with some older HP and IBM/Lexmark printer drivers. See if you can get a driver update if you have those problems.
You can save these settings as your preference when starting AviSys. See Options.