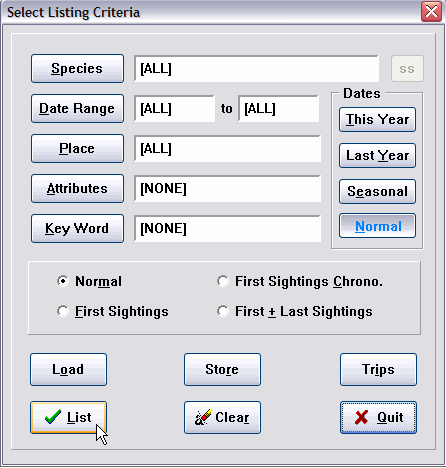
This is the dialog you use to enter the criteria for a Sighting File listing. In its initial state, it is set up to list on your screen all records in the file, as indicated by the status of All for Species, Date Range and Place, and None for the other criteria.
By simply filling in the criteria dialog, you can request records selected by any combination of species, date range, Place, Attributes and Key Words, as well as asking for three kinds of “First Sightings."
When you click the Species button, you are taken to the Master Checklist where you can select a species for the listing. When the selection is completed you are returned to criteria selection and the species is displayed in the menu. Only records of that species will be displayed in the listing.
While you are in the Master Checklist to select a listing species, a special red X cancel button is enabled. If you change your mind, click the button and you will be returned to the criteria dialog without species selection and any prior species selection is cleared to All.
You click the Date Range button to restrict the listing to sightings recorded within a range of dates. The Date Entry calendar is presented to enter both the starting date and the ending date. The selected dates are displayed in the criteria menu. Date ranges are inclusive—sightings for both dates, and those in between, are displayed. The usable date range is 1/1/30 through 12/31/2029.
We have made the date labels "hot" --- that is, if you click the label, it is the same as clicking the button,and the appropriate criteria dialog pops up. Further, if a data range has already been entered, if you clickin either of the date labels, only the appropriate "from" or "to" date dialog will pop up. This allows you to change only one of the dates instead of having to go through both dates as when you click the button.
If you click the red X cancel button while in the date entry calendar, you are returned to the criteria dialog and the date range is reset to All.
If you need a date range of “This Year” or “Last Year,” click the appropriate button to insert, for example, the date range 1/1/(this year)-12/31/(this year), assuming your computer’s clock-calendar has been set properly. This saves a lot of keystrokes when you are running year-to-date listings.
The “Seasonal” button completely changes the meaning of the date range. For example, a Seasonal date range of 6/13/89 through 8/21/92 actually means “Select the records that occurred between the dates June 13 and August 21 for each of the years 1989 through 1992. (To be sure we’ve been clear—a record on September 3, 1990 would not be included.) In essence, you can define your own “seasons,” and run listings for them for any range of years.
Normal clears the annual or Seasonal selection.
Clicking the Places button takes you to the Places Tables, where you select a Place which defines the geographic selection for your listing. The selected Place is displayed in the criteria menu. Only records assigned to that Place, and Places linked to it, will be included in the listing.
If you click the red X cancel button while in the Places tables, you will be returned to the criteria dialog and the Place selection will be reset to All.
See Z-LIST for information on using multiple Places.
Since your usage of Attributes and Key Words should be an integral part of your AviSys usage strategy, information about those criteria is covered in Chapter 2, Power and Strategy. Either of those criteria are entered by clicking the associated button, and they are canceled and cleared to None with red X cancel button in the associated dialog.
First Sights selects the earliest sighting, by date, within the other selection criteria, for each species. Only one record, the earliest, will be presented for each species.
First Chrono produces results identical to 1st Sights, but lists the records in date sequence—a chronology of your first sightings.
First + Last selects the earliest and latest sightings within the other criteria. Two records are listed for each species, unless there is only one record for a species, or there is more than one but all are on the same date.
Normal clears any selected “First” button.
We have described the listing options of First Sightings and First Sightings Chrono, which produce only the first (earliest) records for each of the species seen on the described (Place and Date) trip—basically one record per species, the earliest by date. (The Chrono option presents the records in date sequence rather than species sequence.)
These options, when a Date and/or Place criteria is used, present a secondary prompt, “Do you want ONLY LIFERS seen this trip?” If you respond positively, the entire meaning of the “First” option changes—now it means really first, life sightings only. This is how you ask the question, “Which of the sightings on that trip to Texas last week were lifers?”
While doing a “First” listing without a Place and Date will produce your total Life sightings, we recommend you select a date range which covers all your records, such as 1/1/30-12/31/29, 1930 through 2029. The reason for doing that is described next.
When "Only Lifers" are listed, as described above, if there is a /? Attribute in any of the records, those records will be automatically ignored. This provides a way for the user to identify records that were multiple instances of the same life bird on the same day. Because AviSys does not record time of day, it has no way of knowing which of multiple records of the same life species on the same day is the true life record. The record without /? becomes the "real lifer" and is listed when "Only Lifers" is selected.
If you plan to use this feature, you should add /? Not a Lifer to your Attributes table. Remember, this is required only when you record a life species more than once on the same day, and only if you are particular about having the exact life record listed.
The Clear button clears all the criteria to All or None. To clear an individual criteria, simply click its button and then click the red X cancel button for the dialog presented. In the case of a Species selection, a special red X cancel button is enabled on the Master Checklist just for that purpose.
When you have the listing criteria set as you wish, click the List button.
Then select the record sequence (Species, Date or Place) from the Sequence dialog. (Note that selecting Place sequence results in a sequence starting with Sites and moving upward through the table with Continents last.)
See Named Stored Reports for information on these buttons. It will replicate a set of report criteria you have stored.
See the Trip Log for information about this button. It will place the criteria for a stored trip in this criteria dialog.