The double-arrow "up-down" button at the bottom of the main screen will enlarge the main window and other major AviSys windows to nearly fill your screen. Try out the larger size -- however, many people are actually more comfortable with the smaller screen size.
The main screen is the Master Checklist of either the Clements’ Checklist of the birds of the world or the ABA North America Checklist, or the birds of a state, nation or custom checklist, depending on the mode you are in. (The world list, of course, also contains the North America birds.) You rotate through the three modes by clicking the Switch button or pressing the S key.
In World Mode, your life "seen" count is posted at the bottom of the screen, and the birds you have seen anywhere are marked with a ' (single quote).
In N.A. Mode, the birds you have seen in the ABA N.A. Area are marked '' (double quote) and your ABA seen count is posted at the bottom of the screen. Birds you have seen elsewhere are marked with a ' (single quote).
In Checklist Mode, only the birds of an invoked nation, state, or custom checklist are displayed.
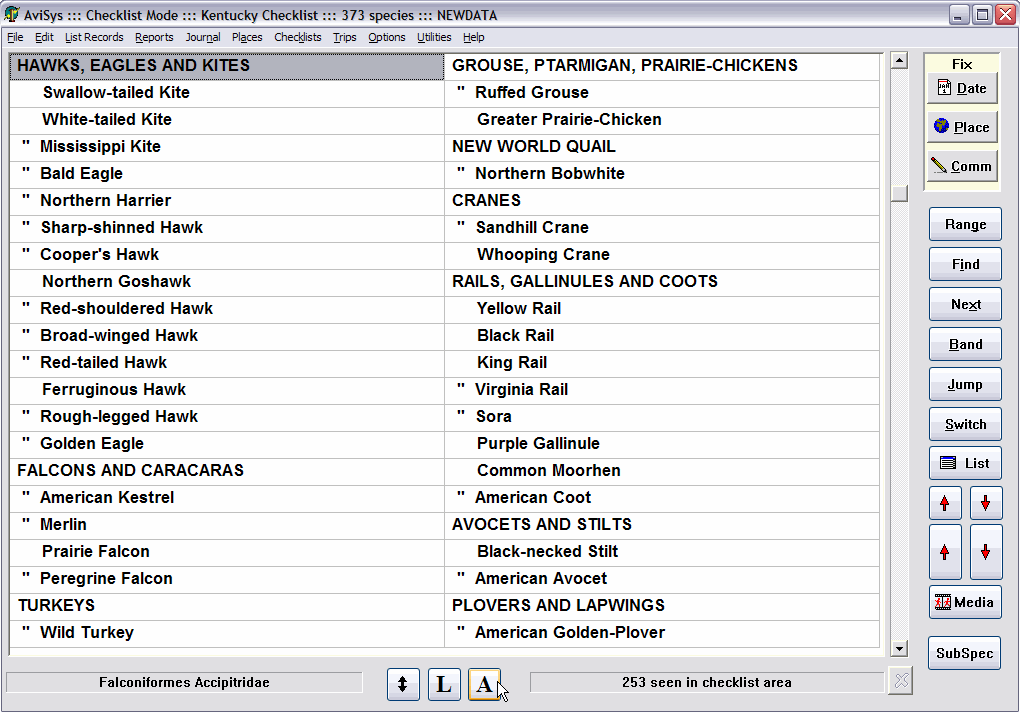
The example above is in Checklist Mode. The California checklist is invoked. Only the California species are displayed in the main list. Those the user has seen in California are marked '' and those seen anywhere else are marked '. (The Northern Goshawk has not been seen in California, but has been seen somewhere else.) If this were a nation checklist, the endemics for that nation would be (optionally) marked !.
The information in the title bar shows the mode, the checklist name, the number of species in the currently invoked checklist, the number of endemics, and the data set in use (it's "JERRY'S" here).
The panel at the bottom right shows the number of species the user has seen in California.
The panel at the bottom left shows the Latin name (Genus, species) of the species that is highlighted, or the Latin name (Order, Family) of the highlighted “Family.” Note that “Family” names have been chosen for usefulness in navigating the checklist, not taxonomic accuracy.
If you want to have the Latin names displayed in the list, you can flip back and forth between Latin and English name display.by tapping the F12 key or tapping the "L" button . When Latin names are displayed, the English name of the highlighted bird is displayed in the lower left.
If you click the SS button, the subspecies for the highlighted bird are displayed.
Use the keyboard cursor-up and cursor-down arrow keys, or the small red arrow buttons, to move the cursor through the list. Note that when the cursor gets to the bottom right of the current page, the whole page scrolls upward, one species at a time. Thus, the list “snakes” from the bottom right up to the top right, then jumps down to the bottom left and up to the top left like an “S” on its side. The reverse happens when you are at the top of the list and move the cursor upward, provided you are not at the first record in the list. Play with it—you’ll get the idea. PgUp and PgDn, or the large red arrow buttons, move you a full page at a time. Ctrl-Home and Ctrl-End take you to the beginning and end of the list, respectively. The cursor-left-right keys move the cursor horizontally. Home/End highlight the first/last birds on the page.
Highlight the family name “SHEARWATERS and PETRELS,” or any family that’s not already at the top of the list, and press Enter, or double-click the name. That family, and all its members, are placed at the top left of the list. This allows you to easily see an entire family at the same time.
The Master Checklist also has a standard Windows scroll bar that performs the same functions as the red arrow buttons and the keyboard cursor keys. While many people are familiar with scroll bars, and like using them, other people find them hard to hit. That’s why we added the buttons. Use your choice.
Double-click, or press Enter, on a species to start a sighting entry.
To get to specific birds in the Master Checklist, use the Find and Next buttons, the Jump button, or the Band button. You can also use Hot Keys.
(By the way, pressing . (period) starts a Find -- pressing , (comma) performs a Next -- and pressing / (slash) starts a Band Code operation. Clicking the right mouse button pops up the Jump Table.)
The "Fix" buttons cause the respective elements of the last sighting entry to "stick," (be automatically repeated), for subsequent sighting entries until the "fixes" are turned off. You use these buttons to establish a "trip," or "outing," so that after the first entry you need only click on each bird and confirm the sighting (actually a triple-click, if you wish). You can "fix" all of the comment, or just part of it (See "Fixing - Repeating Part of a Comment") In the illustration, above, only the Comment element is "fixed."
You click the State CL button to edit the State Checklist Status of the highlighted bird. (It’s the Range button if you have the Nation Checklist Add-On, and StCL or Rng if you are using the Birds of North America CD-ROM Add-On, in which case there is a red "film" button also displayed.)
Click the List button to display all sighting records for the currently highlighted bird. (You can also press the ? keyboard key to get the same result).
The "A" button lets you rotate through the four font options in the display.